Battery switch on travel trailer function is crucial for managing power sources. Understanding how your battery switch works is key to enjoying trouble-free camping. This guide will walk you through the different types of switches, their operation, troubleshooting common problems, and essential safety precautions. We’ll cover everything from basic functionality to choosing the right switch for your needs, ensuring you’re confident in managing your travel trailer’s power.
We’ll delve into the specifics of different switch types, exploring their advantages and disadvantages, and providing a clear comparison. We’ll also illustrate power flow with diagrams, guide you through troubleshooting steps, and offer safety tips for handling your electrical system. By the end, you’ll have a comprehensive understanding of your travel trailer’s battery switch and be better equipped to maintain it.
Types of Battery Switches in Travel Trailers
Choosing the right battery switch for your travel trailer is crucial for managing power and protecting your batteries. Different types offer varying levels of control and complexity, so understanding their differences will help you make an informed decision. This section will Artikel the common types, their pros and cons, and help you compare them.
Single-Pole Battery Switches
Single-pole switches are the simplest type. They offer a single on/off function, connecting or disconnecting a single battery to the trailer’s electrical system. They’re inexpensive and easy to install, making them a good choice for trailers with a single battery setup. However, they lack the flexibility of more complex switches.
Double-Pole Battery Switches
Double-pole switches provide more control. They allow you to isolate two separate battery banks (like a house battery and a starting battery) independently. This means you can switch one on while leaving the other off, providing better control over your power usage and preventing accidental drain of one battery from the other. They are slightly more complex to install than single-pole switches but still relatively straightforward.
Double-Pole Double-Throw (DPDT) Battery Switches
DPDT switches offer the most control and flexibility. They allow you to switch between two different battery sources (like shore power and your house batteries) or to combine both. This is beneficial for charging batteries from shore power while simultaneously powering the trailer. However, they are the most complex to install and are usually more expensive. A common use is switching between your house batteries and the truck’s starting battery, or using the truck’s alternator to charge the trailer batteries.
Battery Switch Comparison
| Feature | Single-Pole | Double-Pole | Double-Pole Double-Throw (DPDT) |
|---|---|---|---|
| Number of Batteries Controlled | One | Two (independent control) | Two (selectable, combinable) |
| Complexity | Low | Medium | High |
| Cost | Low | Medium | High |
| Installation Difficulty | Easy | Moderate | Difficult |
| Flexibility | Low | Medium | High |
Battery Switch Functionality and Operation
A battery switch in your travel trailer is the central control point for managing power flow from various sources to your trailer’s electrical system. Understanding its operation is crucial for efficient power management and preventing damage to your batteries or other components. It allows you to selectively use your house batteries, shore power, or generator power, or a combination thereof.Your battery switch acts like a sophisticated electrical valve, directing current to where it’s needed.
Most common switches offer several positions, each controlling different power paths. These positions allow you to charge your batteries, power your trailer from shore power, or run your appliances off your batteries while disconnected from shore power. Incorrect operation can lead to drained batteries or damaged electrical systems.
Battery Switch Positions and Their Functions
The specific positions and labels on your battery switch might vary slightly depending on the manufacturer, but the core functions remain consistent. A typical switch will have positions that control power from your house batteries, shore power, and often a combination of both. Some more advanced switches might also include a “generator” position, allowing you to charge batteries or power the trailer directly from a generator.
It’s essential to consult your switch’s specific instructions for detailed guidance.
So, you’re planning a trip? Awesome! Don’t forget to sort out your travel insurance; check out aon travel insurance for some solid options. Then, if you’re hitting the road in a travel trailer, understanding the battery switch on travel trailer function is key to keeping your lights on and fridge cold. Knowing how to manage your power is just as important as having good coverage – happy travels!
Power Flow Through the Battery Switch
Imagine the battery switch as a central hub. Power from different sources (shore power, generator, and house batteries) enters the switch. Depending on the switch position, this power is then directed either to the trailer’s 12V system (powering lights, water pump, etc.) or to the batteries for charging. When you’re connected to shore power, the switch will often route power to charge the batteries and simultaneously power the trailer’s 12V system.
If you’re using the generator, a similar process occurs. When disconnected from external power sources, the switch directs power from the house batteries to the trailer’s 12V system.
Power Flow Diagram
A simple flowchart can effectively illustrate this. Imagine a box representing the battery switch with different input and output lines.* Input Lines: Shore Power, Generator, House Batteries.
Output Lines
Trailer 12V System, Battery Charging Circuit.Depending on the switch position (e.g., “Shore Power,” “Batteries,” “Both,” “Off”), different input lines connect to different output lines. For instance, in the “Shore Power” position, the shore power input would connect to both the trailer 12V system and the battery charging circuit. In the “Batteries” position, only the house battery input would connect to the trailer 12V system.
The “Off” position disconnects all inputs and outputs, preventing any power flow. A detailed visual representation would show these connections clearly, using arrows to indicate the direction of power flow. This visualization would greatly aid in understanding the switch’s functionality.
Wiring Diagrams and Installation Procedures
Installing a battery switch in your travel trailer is a relatively straightforward process, but proper wiring and safety precautions are crucial. Incorrect wiring can lead to electrical malfunctions, damage to your equipment, or even fire. This section details a typical installation and provides guidance on safe practices.This section will cover a common battery switch configuration and provide a step-by-step installation guide.
Remember to always consult your specific battery switch’s instructions and your travel trailer’s wiring diagram for accurate and safe installation. Improper installation can void warranties and create safety hazards.
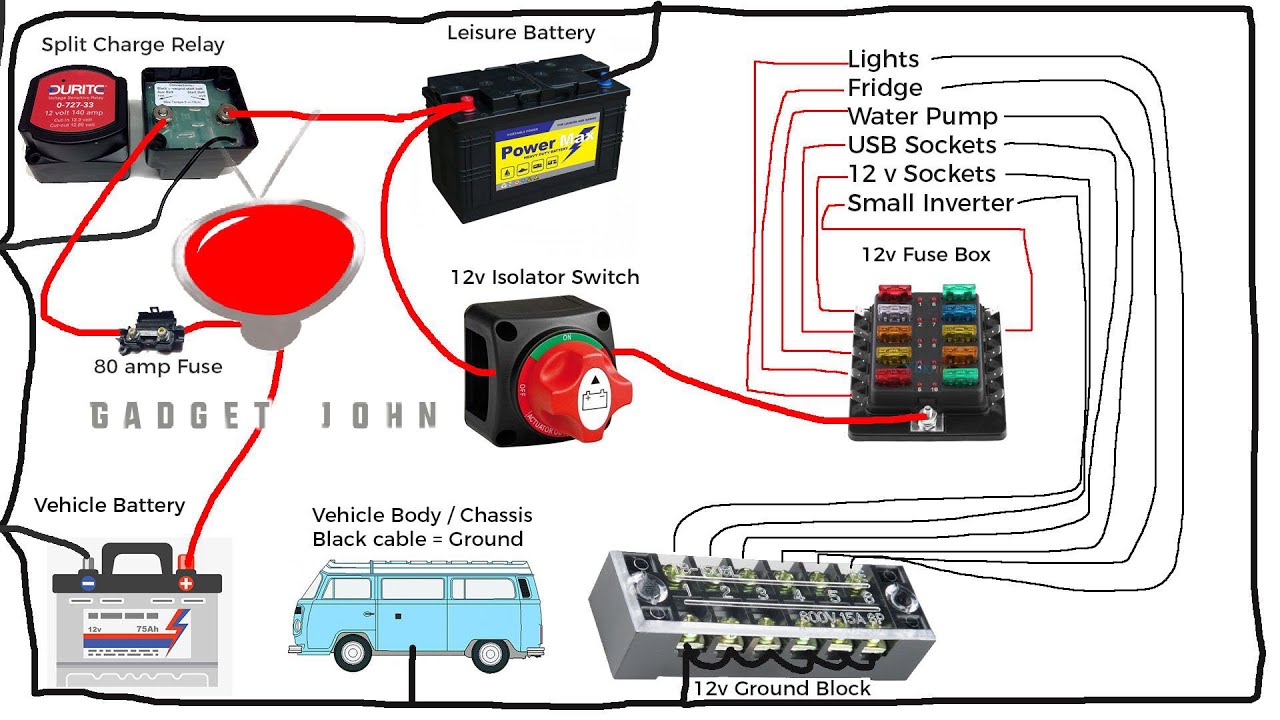
Simple Battery Switch Wiring Diagram
The following diagram illustrates a basic setup with two batteries and a battery switch. This allows you to select which battery (or both) powers your trailer’s systems. Note that this is a simplified representation; your actual wiring might vary depending on your trailer’s specific electrical system.Imagine a rectangle representing the battery switch. From the top of the rectangle, two thick lines extend upwards, representing the positive (+) terminals of your two batteries (Battery 1 and Battery 2).
Each line connects to a separate terminal on the switch. From the bottom of the rectangle, a thicker line extends downward, representing the positive (+) cable leading to the trailer’s distribution panel. Another line, thinner, extends to the negative (-) terminal of Battery 1, then continues to the negative (-) terminal of Battery 2 and finally to the chassis ground.
This negative busbar connects all negative terminals to ground, ensuring a complete circuit. The switch allows you to isolate either or both batteries from the trailer’s electrical system.
Step-by-Step Installation of a Battery Switch
Before beginning any electrical work, disconnect the negative (-) terminal from both batteries. This is a crucial safety precaution to prevent accidental short circuits and shocks.
- Choose a Suitable Location: Select a location for the battery switch that’s easily accessible, well-ventilated, and protected from the elements. Avoid areas where the switch could be accidentally damaged or submerged in water.
- Gather Your Materials: You’ll need the battery switch, appropriately sized wiring (usually 4-gauge or larger for the main positive cables and 8-gauge for the smaller circuits), wire connectors (crimp-on ring terminals and butt connectors are recommended), wire loom or conduit for protection, and appropriate tools (wire strippers, crimpers, a wrench, etc.).
- Wire Sizing: Use appropriately sized wire to handle the amperage of your electrical system. Undersized wire can overheat and pose a fire hazard. Consult a qualified electrician or refer to the wire ampacity chart to ensure you select the correct gauge.
- Connect the Positive (+) Cables: Securely connect the positive (+) cables from each battery to the appropriate terminals on the battery switch using crimp-on ring terminals. Ensure the connections are tight and corrosion-resistant.
- Connect the Positive (+) Output: Connect the positive (+) cable from the battery switch output to the positive (+) busbar in your trailer’s distribution panel using a ring terminal. Again, ensure a secure and corrosion-resistant connection.
- Connect the Negative (-) Cables: Connect all negative (-) terminals from both batteries to the chassis ground. This can be done using a negative busbar or by connecting directly to a suitable ground point on the trailer frame. Ensure a solid, clean connection.
- Secure the Switch: Mount the battery switch securely in its chosen location using appropriate hardware. Ensure it’s firmly attached and won’t vibrate loose.
- Protect the Wiring: Use wire loom or conduit to protect the wiring from abrasion and the elements. This will help prevent damage and ensure the longevity of your installation.
- Test the Installation: After completing the installation, carefully reconnect the negative (-) terminals to both batteries. Test the battery switch to ensure it functions correctly and that all circuits operate as expected.
Always double-check all connections before reconnecting the negative battery terminals. Improper wiring can lead to serious electrical problems.
Battery Switch Maintenance and Upkeep
Regular maintenance of your travel trailer’s battery switch is crucial for ensuring reliable power and preventing costly repairs. Neglecting this simple task can lead to corrosion, poor connections, and ultimately, battery failure. A proactive approach to maintenance will extend the lifespan of your battery switch and your entire electrical system.Proper inspection and cleaning are key components of maintaining your battery switch.
Corrosion buildup on terminals and within the switch itself can restrict current flow, leading to reduced performance and potential overheating. Regularly checking for damage, such as loose wiring or cracked components, will help identify problems before they become major issues.
Battery Switch Inspection Schedule
A simple inspection should be performed at least twice a year, ideally before and after your main camping season. This involves visually checking all connections and the switch itself for signs of corrosion, damage, or looseness. A more thorough inspection, including cleaning and tightening, should be done at least once a year. If you frequently use your travel trailer, or if it’s stored in a particularly humid or corrosive environment, more frequent inspections might be beneficial.
Cleaning and Tightening Battery Switch Connections
Cleaning corroded connections is straightforward but requires careful attention. First, disconnect the negative battery cable from the battery switch. This is a crucial safety precaution to prevent accidental short circuits. Use a wire brush or a specialized terminal cleaner to remove any corrosion from the terminals and the switch itself. A baking soda and water paste can also be effective at neutralizing corrosion.
After cleaning, apply a corrosion inhibitor, such as dielectric grease, to the terminals to prevent future corrosion. Finally, firmly tighten all connections using the appropriate wrench or socket. Make sure connections are snug but avoid over-tightening, which could damage the terminals. After cleaning and tightening, reconnect the negative battery cable.
Addressing Corrosion and Damage
If you find significant corrosion or damage to the switch itself, replacement may be necessary. Minor corrosion can usually be cleaned, but severe damage to the switch housing or internal components compromises its functionality and safety. Remember to always disconnect the negative battery cable before undertaking any maintenance or repair work. If you’re unsure about any aspect of the repair process, consult a qualified RV technician.
So, you’re planning a trip? Awesome! First things first: get travel insurance. Check out aon travel insurance for some solid options. Then, if you’re hitting the road in an RV, understanding the battery switch on travel trailer function is crucial for keeping your lights on and your fridge cold. Knowing how to manage your power is just as important as having that peace of mind insurance provides!
Choosing the Right Battery Switch for Your Needs
Selecting the correct battery switch for your travel trailer is crucial for safe and reliable power management. The wrong switch can lead to insufficient power, potential damage to your electrical system, or even safety hazards. This section will guide you through the process of choosing a switch that perfectly matches your trailer’s needs.Choosing the right battery switch involves considering several key factors.
These include the amperage rating, the number of batteries in your system, your power demands, and of course, your budget. Let’s explore each of these aspects in more detail.
Battery Switch Amperage Ratings and Suitability
The amperage rating of your battery switch dictates the maximum current it can safely handle. This rating should always exceed the combined amperage draw of all devices you intend to use simultaneously. For example, a travel trailer with a 100-amp hour battery bank and several high-draw appliances (air conditioner, microwave, etc.) might require a 100-amp or even a higher-rated switch to handle surge currents.
Underestimating this rating could lead to overheating and potential fire hazards. Conversely, overestimating the amperage isn’t necessarily wasteful; it simply ensures a greater safety margin. A lower amperage switch in a high-demand system will be a significant bottleneck and a safety risk.
Factors Influencing Battery Switch Selection, Battery switch on travel trailer function
Several factors contribute to choosing the appropriate battery switch. The number of batteries directly impacts the switch’s configuration. A single battery system needs a simple switch, while dual-battery setups require a switch capable of isolating and combining both batteries. Power demands, determined by the combined amperage draw of your appliances and devices, dictate the necessary amperage rating.
Budget constraints naturally influence the choice, with higher-capacity, more feature-rich switches generally costing more. Consider your usage patterns; frequent use of high-draw appliances requires a more robust switch than occasional use of low-power devices.
Recommendations for Specific Travel Trailer Configurations
For a small travel trailer with a single battery and minimal power demands (basic lighting, small refrigerator), a 50-amp switch might suffice. A mid-sized trailer with dual batteries and moderate power usage (air conditioner, microwave, some lighting) would benefit from a 100-amp switch or higher. Large travel trailers with multiple batteries and extensive power requirements (multiple air conditioners, microwave, electric water heater) may need a 200-amp or even higher capacity switch to ensure safe and reliable operation.
Always consult your trailer’s electrical specifications and the individual amperage ratings of your appliances to make an informed decision. Remember that safety should always be the priority when choosing a battery switch.
Mastering your travel trailer’s battery switch is about more than just flipping a switch; it’s about understanding your RV’s power system and ensuring safe and reliable operation. From choosing the right switch for your setup to troubleshooting common issues, this guide has provided you with the knowledge to confidently manage your power. Remember to prioritize safety, regularly inspect your system, and consult a professional if needed.
Happy travels!
Key Questions Answered: Battery Switch On Travel Trailer Function
What happens if my battery switch is faulty?
A faulty switch can lead to no power, intermittent power, or even overheating, potentially damaging your batteries or other components. Get it checked by a professional.
How often should I inspect my battery switch?
Regularly inspect your switch (at least every 3 months or before each trip) for corrosion, loose connections, or damage. Tighten any loose connections and clean corroded terminals.
Can I install a battery switch myself?
While possible for some, it’s recommended to have a qualified electrician install or repair your battery switch, especially if you’re not comfortable working with electrical systems.
What size battery switch do I need?
The amperage rating of your battery switch should match or exceed the total amperage draw of your appliances and accessories. Consult your RV’s manual or a qualified electrician for the correct sizing.
